Tag: Comfort food

  • Kacche Aam Ki Launji Recipe | गर्मी के मौसम में बनाइए खट्टी मीठी आम की लौंजी | Chef Sanjyot Keer

    Kacche Aam Ki Launji Recipe | गर्मी के मौसम में बनाइए खट्टी मीठी आम की लौंजी | Chef Sanjyot Keer

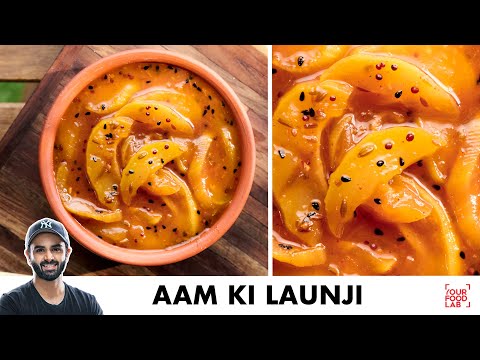
    Full written recipe for Aam Ki Launji

    Prep time: 10-15 minutes
    Cooking time: 20-25 minutes
    Serves: 1kg

    Ingredients:
    RAW MANGO | कच्ची कैरी 3 NOS. (500 GRAMS)
    OIL | तेल 2 TBSP
    WHOLE SPICES
    CUMIN SEEDS | जीरा 1 TBSP
    CAROM SEEDS | अजवाइन 1/2 TSP
    FENNEL SEEDS | सौंफ 1 TSP
    ONION SEEDS | कलोंजी 1 TSP
    ASAFOETIDA | हींग 1 TSP
    MUSTARD SEEDS | राई 1 TSP
    FENUGREEK SEEDS | मेथी के बीज 1/2 TSP
    WATER | पानी 1 CUP
    SALT | नमक 1/2 TSP
    KASHMIRI RED CHILLI POWDER | कश्मीरी लाल मिर्च पाउडर 2 TSP
    GARAM MASALA | गरम मसाला A PINCH (OPTIONAL)
    JAGGERY | गुड़ 1 CUP (200 GRAMS)
    SALT | नमक IF REQUIRED
    BLACK SALT | काला नमक 1/4 TSP
    CHAAT MASALA | चाट मसाला 1/4 TSP
    Method:
    Peel the skin of the raw mango. Further cut into thick strips.
    Set a wok on medium heat, heat oil and ad cumin seeds along with all the remaining whole spices, stir for few seconds and add raw mangoes, mix it well and cook for 1-2 minutes.
    Further add water, salt, kashmiri red chilli powder & garam masala, stir well then cover & cook over medium low flame for 2-3 minutes, the raw mangoes will soften slightly.
    Add jaggery, stir well & then increase the flame to melt all the jaggery & then continue to cook it for 5-6 minutes until it thickens up slightly.
    Once cooked & thickened slightly, taste & adjust the salt, then add black salt & chaat masala, stir well & then switch off the flame.
    Cool down and serve as a condiment with your favourite paratha or meal.
    Store it in a well sterilized glass and refrigerate it for months.

    #yfl #SanjyotKeer #aamkilaunji

    The Music I use in All my videos – https://bit.ly/3CdPbSc
    (Best for independent creators)

    Follow us on all platforms:
    Facebook – https://bit.ly/3o6alLt
    Instagram – https://bit.ly/2RFkL8z

    Follow my personal handles here: (Chef Sanjyot Keer)
    Facebook – https://bit.ly/3tpjqQA​​​​​​​​​
    Instagram – https://bit.ly/3o0FZK8
    Twitter – https://bit.ly/33qQpJN

    Intro 0:00
    Aam ki launji 1:00
    Plating 4:46
    Outro 5:31

  • Chicken Tikka Biryani Recipe | Chicken Dum Biryani | चिकन टिक्का बिरयानी | Chef Sanjyot Keer

    Chicken Tikka Biryani Recipe | Chicken Dum Biryani | चिकन टिक्का बिरयानी | Chef Sanjyot Keer

    Biryani Masala: https://youtu.be/HP2bVwNHJfM
    Chicken Dum Biryani: https://youtu.be/uygb9O-MDPw
    Egg Dum Biryani: https://youtu.be/yZavuNBAcB4
    Mutton Dum Biryani: https://youtu.be/kPRBBIqoF4o
    Veg Dum Biryani: https://youtu.be/HP2bVwNHJfM

    Full written recipe for Chicken Tikka Biryani

    Prep time: 30-35 minutes
    Cooking time: 1 hour 30 minutes
    Serves: 6-7 people

    Chicken tikka
    Ingredients:
    First marination
    CHICKEN | चिकन 500 GRAMS (THIGH)
    SALT | नमक TO TASTE
    KASHMIRI RED CHILLI POWDER | कश्मीरी लाल मिर्च पाउडर 1/2 TSP
    GINGER GARLIC CHILLI PASTE | अदरक लेहसुन और मिर्च की पेस्ट 1 TBSP
    LEMON JUICE | नींबू का रस OF 1 LEMON
    Second Marination
    MUSTARD OIL | सरसों का तेल 1 TBSP
    KASHMIRI RED CHILLI POWDER | कश्मीरी लाल मिर्च पाउडर 1 TBSP
    HUNG CURD | टंगा हुआ दही 4 TBSP
    GINGER GARLIC CHILLI PASTE | अदरक लेहसुन और मिर्च की पेस्ट 1 TBSP
    POWDERED SPICES
    TURMERIC POWDER | हल्दी पाउडर 1/4 TSP
    CORIANDER POWDER | धनिया पाउडर 1 TSP
    GARAM MASALA | गरम 1/4 TSP
    CUMIN POWDER | जीरा पाउडर 1/2 TSP
    BLACK SALT | काला नमक A PINCH
    CHAAT MASALA | चाट मसाला A PINCH
    ROASTED KASURI METHI POWDER | भुनी हुई कसूरी मेथी का पाउडर A PINCH
    SALT | नमक TO TASTE
    LIVE CHARCOAL | जलता हुआ कोयला OPTIONAL
    GHEE | घी OPTIONAL
    BUTTER | मक्खन AS REQUIRED (MELTED) (FOR COOKING)

    Birista
    Ingredients:
    ONION | प्याज़ 500 GRAMS (SLICED)
    Method:
    To make birista you need to cut the onions in a specific way, so firstly peel the onion & cut them in half & now you need to cut the onions length wise, make sure that the slices are neither too thin nor too thick & the slices are evenly cut.
    Once you have cut all the onions you need to separate all the layers.
    Now to fry the onions, heat oil in a deep pan till it gets moderately hot, if you have a thermometer then the temperature of the oil should be 135 C.
    The quantity of the oil should not be too much, the oil should only come up till the surface of the onions.
    Once the oil is hot, transfer the onions & fry the onions on high flame while continuously stirring them, the onions will start releasing their moisture & the temperature of the oil will tend to drop which is why you’ll need to fry them on high flame.
    If the oil is extremely hot in the beginning the onions will fry quickly from the outside but won’t lose their internal moisture & they will turn out to be limp & not crispy.
    After frying them for 15-20 minutes & once they get slightly light golden brown, you’ll need to be very attentive, remove the onions from the hot oil using a spider at this very stage, you can use a ladle to scoop out the onions from the oil & then transfer them onto the spider.
    Transfer the fried onions on a tissue lined tray or plate & spread them using two forks so that they cool down quickly, dab them from the top using a tissue paper to get rid of any excess oil, reserve the oil to use in the marinade & in the further cooking process.
    Let the birista cool down for 5-6 minutes, your perfectly coloured & crispy birista is ready.
    We will use 80% of the birista for the marinade & the remaining 20% will be used while layering the biryani & as garnish.
    Make sure that you reserve a few tablespoons of the oil that you fried the barista in, it will be required in the further cooking processes.
    Chicken base masala
    Ingredients:
    CURD | दही 3/4 CUP
    GINGER GARLIC PASTE | अदरक लेहसुन की पेस्ट 1 TBSP
    POWDERED SPICES
    TURMERIC POWDER | हल्दी पाउडर 1 TSP
    KASHMIRI RED CHILLI POWDER | कश्मीरी लाल मिर्च पाउडर 1 TBSP
    SPICY RED CHILLI POWDER | तीखी लाल मिर्च पाउडर 1 TSP
    CORIANDER POWDER | धनिया पाउडर 1 TBSP
    BIRYANI MASALA | बिरयानी मसाला 1.5 TBSP
    SALT | नमक TO TASTE
    BIRISTA OIL | बिरिस्ता वाला तेल 2 TBSP
    BIRISTA | बिरिस्ता 80%
    FRESH CORIANDER | हरा धनिया A HANDFUL (CHOPPED)
    MINT | पुदीना A HANDFUL (CHOPPED)
    BIRISTA OIL | बिरिस्ता वाला तेल 2-3 TBSP
    TOMATO | टमाटर 2 SMALL. (SLICED)
    SALT | नमक TO TASTE
    HOT WATER | गरम पानी AS REQUIRED
    SALT | नमक IF REQUIRED
    FRESH CORIANDER | हरा धनिया
    MINT | पुदीना
    BIRISTA | बिरिस्ता

    Rice
    Ingredients:
    BASMATI RICE | बासमती चावल 500 GRAMS
    WATER | पानी AS REQUIRED
    SALT | नमक AS REQUIRED
    WHOLE SPICES
    BAY LEAF | तेज पत्ता 2 NOS.
    CINNAMON | दालचीनी 1 INCH.
    GREEN CARDAMOM | हरी इलायची 4 NOS.
    BLACK PEPPERCORNS | साबुत काली मिर्च 4 NOS.
    CLOVES | लौंग 4 NOS.
    STAR ANISE | चकरी फूल 1 NO.
    CARAWAY SEEDS | शाह जीरा 1 TSP.
    GREEN CHILLI | हरी मिर्च 2 NO. (SLIT)
    LEMON JUICE | नींबू का रस OF 1/2 LEMON (ADD THE SLICE)
    Final layering & cooking
    FRESH CORIANDER | हरा धनिया AS REQUIRED
    MINT | पुदीना AS REQUIRED
    BIRISTA | बिरिस्ता A SMALL HANDFUL
    GHEE | घी 2 TBSP (MELTED)
    MILK + SAFFRON | दूध और केसर 2-3 TBSP

    #YFL #SanjyotKeer #chickentikkabiryani

    The Music I use in All my videos – https://bit.ly/3CdPbSc
    (Best for independent creators)

    Follow us on all platforms:
    Facebook – https://bit.ly/3o6alLt
    Instagram – https://bit.ly/2RFkL8z

    Follow my personal handles here: (Chef Sanjyot Keer)
    Facebook – https://bit.ly/3tpjqQA​​​​​​​​​
    Instagram – https://bit.ly/3o0FZK8
    Twitter – https://bit.ly/33qQpJN

  • Veg Pulao Recipe | Easy One Pot Pulao Recipe | वेज पुलाओ बनाने का तरीका | Chef Sanjyot Keer

    Veg Pulao Recipe | Easy One Pot Pulao Recipe | वेज पुलाओ बनाने का तरीका | Chef Sanjyot Keer

    Biryani Masala: https://youtu.be/HP2bVwNHJfM

    Full written recipe for Veg Pulao

    Prep time: 30 minutes (including soaking time)
    Cooking time: 20-25 minutes
    Serves: 5-6 people

    Ingredients:
    BASMATI RICE | बासमती चावल 2 CUPS
    WATER | पानी AS REQUIRED
    OIL | तेल 1 TBSP
    GHEE | घी 2 TBSP
    WHOLE SPICES
    CUMIN SEEDS | जीरा 1/2 TSP
    GREEN CARDAMOM | हरी इलायची 3 NOS.
    BLACK CARDAMOM | बड़ी इलायची 1 NO.
    CINNAMON | दालचीनी 1 INCH
    CLOVES | लौंग 4-5 NOS.
    BLACK PEPPERCORNS | साबुत काली मिर्च 4-5 NOS.
    BAY LEAF | तेज पत्ता 2 NOS.
    ONION | प्याज़ 2 NOS. (SLICED)
    GINGER GARLIC GREEN CHILLI PASTE | अदरक लेहसुन और मिर्च की पेस्ट 2 TBSP
    TOMATO | टमाटर 1 NO. (SLICED)
    SALT | नमक TO TASTE
    HOT WATER | गरम पानी A SPLASH
    POWDERED SPICES
    TURMERIC POWDER | हल्दी पाउडर 1/2 TSP
    SPICY RED CHILLI POWDER | तीखी लाल मिर्च पाउडर 1 TSP
    KASHMIRI RED CHILLI POWDER | कहस्मीरी लाल मिर्च पाउडर 2 TSP
    CORIANDER POWDER | धनिया पाउडर 1 TSP
    HOT WATER | गरम पानी A SPLASH
    CURD | दही 3/4 CUP
    BIRIYANI MASALA | बिरयानी मसाला 1 TBSP
    POTATO | आलू 2 NOS. (DICED)
    CARROT | गाजर 1 NO. (DICED)
    FRENCH BEANS | फ्रेंच बीन्स 1/2 CUP (CHOPPED)
    GREEN PEAS | हरे मटर 1/3 CUP
    FRESH CORIANDER | हरा धनिया A LARGE HANDFUL (CHOPPED)
    MINT | पुदीना 2 TBSP (CHOPPED)
    SALT | नमक AS REQUIRED
    WATER | पानी 4 CUPS
    Method:
    Add the basmati rice in a large bowl & wash it well with water until it runs clear, then add fresh water & let the rice soak for 30-45 minutes.
    To make the masala for the pulao set a flat bottomed vessel over high heat & add oil & ghee, let the oil get hot then add all the whole spices along with onions, stir well & cook over medium high flame until the onions turn light golden brown.
    Further add ginger garlic green chilli paste, tomato & salt, stir well & cook over high flame for 2-3 minutes, you can add a splash of hot water if the masala gets too dry.
    Once the tomatoes have cooked, lower the flame & add in all the powdered spices, stir well & immediately add a splash of hot water & cook over medium flame for 1-2 minutes.
    Further add biryani masala to the curd & whisk it well so that no lumps remain & then add the curd into the masala, stir well & cook for a minute.
    Then add potato, carrot, french beans, green peas, fresh coriander & mint, stir well & cook until the potatoes are half cooked.
    Once the potatoes are half cooked, taste the masala & adjust the salt & spiciness, it should taste slightly saltier & spicier than usual to balance the flavours after the rice is added.
    Further discard the water in which the rice was soaked & add the soaked rice to the vessel along with fresh water & stir very gently & bring it to a simmer.
    Once the pulao comes to a simmer, cover the vessel with a lid & cook the pulao over medium low flame for 10 minutes.
    Once cooked for 10 minutes, remove the lid & check the pulao by inserting a spatula from the side to see if there’s water, if the water has dried completely then switch off the flame or else cook the pulao for 2-3 minutes more.
    Once cooked let the pulao rest for 5-10 minute before serving, then serve it by mixing the pulao from the sides & not the middle.
    Your delicious veg pulao is ready, accompany it with some fresh raita & papad.

    #YFL #SanjyotKeer #vegpulao

    The Music I use in All my videos – https://bit.ly/3CdPbSc
    (Best for independent creators)

    Follow us on all platforms:
    Facebook – https://bit.ly/3o6alLt
    Instagram – https://bit.ly/2RFkL8z

    Follow my personal handles here: (Chef Sanjyot Keer)
    Facebook – https://bit.ly/3tpjqQA​​​​​​​​​
    Instagram – https://bit.ly/3o0FZK8
    Twitter – https://bit.ly/33qQpJN

    Intro 0:00
    Rice Soaking 0:43
    Cooking Process 1:17
    Plating 7:33
    Outro 8:24

  • Amrakhand Recipe | Mango Shrikhand Recipe | आमराखंड बनाने का आसान तरीका | Chef Sanjyot Keer

    Amrakhand Recipe | Mango Shrikhand Recipe | आमराखंड बनाने का आसान तरीका | Chef Sanjyot Keer

    Full written recipe for Amrakhand

    Prep time: 5-10 minutes (excluding curd resting time)
    Cooking time: 15-20 minutes
    Serves: 5-6 people

    Ingredients:
    CURD | दही 1 KG
    MANGO | आम 4 NOS. (1 KG APPROXIMATELY)
    SUGAR | शक्कर 6 TBSP
    Method:
    Set a large sieve over a stock pot or any other deep vessel, then place a muslin cloth over it & transfer the curd into the cloth,
    Lift the muslin cloth & squeeze it gently & let the excess water drip off, then twist the cloth & place it in the sieve & keep some weight on the curd.
    Place this setup in the fridge & let it rest overnight, preferably for 12-15 hours.
    To make the mango concentrate, cut the mangoes & collect the mango flesh in a bowl.
    Transfer the mangoes into a mixer grinder jar & grind it into a fine paste.
    Set a pan over medium flame & add the mango pulp along with the sugar, stir well & cook until the mango pulp thickens & reaches a slightly runny jam kind of a consistency, this process will take upto 20 minutes, make sure you keep stirring it frequently.
    Once cooked switch off the flame, transfer the mango concentrate into a bowl & cool it down completely.
    Once rested take out the hung curd & transfer it into a sieve & strain it into a bowl.
    Further whisk the hung curd for 3-4 minutes, then add the cooled down mango concentrate & mix well, add the concentrate in 3 batches.
    Your delicious & rich amrakhand is ready, serve it chilled, you can garnish it with mango cubes, pistachio & dry rose petals

    #YFL #SanjyotKeer #amrakhand

    The Music I use in All my videos – https://bit.ly/3CdPbSc
    (Best for independent creators)

    Follow us on all platforms:
    Facebook – https://bit.ly/3o6alLt
    Instagram – https://bit.ly/2RFkL8z

    Follow my personal handles here: (Chef Sanjyot Keer)
    Facebook – https://bit.ly/3tpjqQA​​​​​​​​​
    Instagram – https://bit.ly/3o0FZK8
    Twitter – https://bit.ly/33qQpJN

    Intro 0:00
    Hung curd 0:54
    Aam process 3:01
    Final process 6:20
    Plating 8:47
    Outro 9:31

  • Meethe Chawal Recipe | Zarda Pulao | प्रेशर कुकर में मीठे चावल बनाने का तरीका | Chef Sanjyot Keer

    Meethe Chawal Recipe | Zarda Pulao | प्रेशर कुकर में मीठे चावल बनाने का तरीका | Chef Sanjyot Keer

    Meethe Chawal

    Prep time: 10 minutes (excluding soaking time)
    Cooking time: 15-20 minutes
    Serves: 5-6 people

    Ingredients:
    SELLA BASMATI RICE | सैला बासमती चावल 2 CUPS
    WATER | पानी AS REQUIRED
    GHEE | घी 2-3 TBSP
    WHOLE SPICES
    CLOVES | लौंग 3-4 NOS.
    GREEN CARDAMOM | हरी इलायची 3 NOS.
    CINNAMON STICK | दालचीनी 1 INCH
    BLACK PEPPERCORNS | साबुत काली मिर्च 3-4 NOS.
    FRESH COCONUT | नारियल 8-10 SLICES
    ALMONDS | बादाम 8-10 NOS.
    CASHEW | काजू 8-10 NOS.
    RAISINS | किशमिश 1 TBSP
    WATER | पानी 2.5 CUPS
    SALT | नमक A PINCH
    SUGAR | शक्कर 2 CUPS
    SAFFRON | केसर A FEW STRANDS
    ORGANIC FOOD COLOUR | ऑर्गेनिक फूड कलर (OPTIONAL)
    Method:
    Add the rice in a bowl and wash it well until the water turns clear then let it soak for 30 minutes in fresh water.
    Once soaked, discard the water & set the soaked rice aside while you do the further process.
    Set a cooker over high heat & once it gets hot add in the ghee, once the ghee gets hot add all the whole spices along with fresh coconut slices, nuts & raisins, stir well & roast for 2-3 minutes.
    Further add in the soaked rice, stir well & cook the rice in the ghee for 2-3 minutes over low flame.
    Add water, salt along with sugar, saffron strands & organic food colour, stir well & cook until the sugar dissolves.
    Further put the lid on & cook over high high flame for 1 whistle, then lower the flame & cook for 10-12 minutes over extremely low flame, make sure that it doesn’t whistle.
    Once cooked, switch off the flame & let the cooker de-pressurize naturally.
    After the cooker has de-pressurized, open the lid then partially cover the cooker & let it rest for 15-20 minutes, the grains of rice will soak up all the remaining sugar syrup.
    Once rested, your meethe chawal is ready, stir well & serve with some fried nuts on top.

    #YFL #SanjyotKeer #meethechawal

    The Music I use in All my videos – https://bit.ly/3CdPbSc
    (Best for independent creators)

    Follow us on all platforms:
    Facebook – https://bit.ly/3o6alLt
    Instagram – https://bit.ly/2RFkL8z

    Follow my personal handles here: (Chef Sanjyot Keer)
    Facebook – https://bit.ly/3tpjqQA​​​​​​​​​
    Instagram – https://bit.ly/3o0FZK8
    Twitter – https://bit.ly/33qQpJN

    Intro 0:00
    Rice Soaking 0:56
    Cooking process 1:53
    Plating 5:44
    Outro 6:19

  • Laccha Paratha Easy Process at Home | लच्छा पराठा बनानेका आसान तरीक़ा | Chef Sanjyot Keer

    Laccha Paratha Easy Process at Home | लच्छा पराठा बनानेका आसान तरीक़ा | Chef Sanjyot Keer

    Butter Chicken: https://youtu.be/RKNogWbAivY
    Paneer Tikka Masala: https://youtu.be/fohA4X5pYSg
    Paneer do Pyaza: https://youtu.be/jwk6G_-FZKM
    Veg Diwani Handi: https://youtu.be/DT8ImRc72-w

    Full written recipe for Laccha Paratha

    Prep time: 15 minutes (excluding dough resting time)
    Cooking time: 3-4 minutes
    Serves: 8-9 parathas

    Ingredients:
    WHEAT FLOUR | गेहूं का आटा 500 GRAMS
    SALT | नमक A PINCH
    CAROM SEEDS | अजवाइन A PINCH
    WATER | पानी 420 ML (APPROXIMATELY)
    OIL | तेल 2 TSP
    GHEE | घी AS REQUIRED (MELTED)
    WHEAT FLOUR | गेहूं का आटा AS REQUIRED
    GHEE | घी AS REQUIRED (FOR COOKING)
    WATER | पानी
    Method:
    To make the dough, add the flour and salt in a mixing bowl, mix and add water gradually as required to knead a semi soft dough, once all the dry flour combines transfer the dough onto the kitchen platform & knead it until smooth & soft.
    Further add add oil and knead until the oil gets incorporated, then form it into a doughball, place it in a bowl & drizzle some oil & cover it with a damp cloth, let the dough rest for at least 1 hour.
    Once the dough is rested, divide in equal size dough balls & place them on a tray or a plate, cover them with a damp cloth while you are shaping the parathas.
    Shaping Method 1
    Take a dough & coat it with dry flour, place it on a platform & roll it out into a thin chapati using a rolling pin, then spread some melted ghee on the chapati & dust dry wheat flour, then roll the thin chapati from one end to the other to make a long rolled cylinder, then again roll the rolled strip from one end to the other & tuck the last bit under.
    Shaping Method 2
    Coat the doughball with dry flour & roll it out into a thin chapati, try to make this one as circular as possible, then apply melted ghee & dust dry flour on it.
    Then make a single slit from the centre of the chapati to the edge, then lift the roll the slit end to make a cone.
    Once you have formed the cone, flatten it out to make a layered doughball.
    Shaping method 3
    Take the dough ball & roll into thin chapati, evenly spread melted ghee over the chapati & dust dry flour over the chapati, fold the chapati while making the pleats, roll the dough and tuck inwards to seal properly & form a layered doughball.
    Tawa Cooking
    Set a tawa over high heat & heat it well, then place the rolled paratha on the tawa & cook until brown spots start to appear, flip & cook from the other side similarly without adding any oil/ghee.
    Once there are even brown spots on both sides then add ghee as required & cook the paratha until crisp & golden brown from both sides.
    Your tawa laccha paratha is ready, serve it with gravies/curries with some butter & chaat masala on the top.
    Tandoor Method (on tawa)
    Set an iron tawa with handle, on high heat, and let it heat well, make sure not to use non-stick tawa, once the tawa is hot enough, apply water on the back of the paratha and stick the paratha over the tawa, stick with your finger tips to ensure it sticks well, cook for a minute on high flame, further flip the tawa and cook the paratha facing on the direct flame. adjust the angle of the tawa while cooking the paratha. Cook until its crisp and golden brown in colour, make sure its cooked well.
    Remove the paratha with a spatula & serve hot with your favourite dish.

    #YFL #SanjyotKeer #lacchaparantha

    The Music I use in All my videos – https://bit.ly/3CdPbSc
    (Best for independent creators)

    Follow us on all platforms:
    Facebook – https://bit.ly/3o6alLt
    Instagram – https://bit.ly/2RFkL8z

    Follow my personal handles here: (Chef Sanjyot Keer)
    Facebook – https://bit.ly/3tpjqQA​​​​​​​​​
    Instagram – https://bit.ly/3o0FZK8
    Twitter – https://bit.ly/33qQpJN

    Intro 0:00
    Dough 0:58
    Method 1 3:21
    Method 2 4:58
    Method 3 6:04
    Tawa Laccha Paratha 7:59
    Tandoor Laccha Paratha 11:33
    Plating 13:06
    Outro 13:40

  • Gujarati Khichdi Kadhi Recipe | गुजराती खिचड़ी कढ़ी | Chef Sanjyot Keer

    Gujarati Khichdi Kadhi Recipe | गुजराती खिचड़ी कढ़ी | Chef Sanjyot Keer

    Full written recipe for Gujarati Khichdi Kadhi

    Prep time: 10-15 minutes
    Cooking time: 35-40 minutes (including soaking time)
    Serves: 3-4 people

    Kadhi
    Ingredients:
    SOUR CURD | खट्टा दही 1 CUP
    GRAM FLOUR | बेसन 1/4 CUP
    GINGER CHILLI PASTE | अदरक मिर्च की पेस्ट OF 2 INCH GINGER & 2 GREEN CHILLIES
    SALT | नमक TO TASTE
    WATER | पानी 3 CUPS
    GHEE | घी 2 TBSP
    WHOLE SPICES
    CUMIN SEEDS | जीरा 1/2 TSP
    MUSTARD SEEDS | राई 1/4 TSP
    CINNAMON | दालचीनी 1 INCH
    CLOVES | लौंग 2-3 NOS.
    RED CHILLI | लाल मिर्च 2-3 NOS.
    ASAFOETIDA | हींग 1/4 TSP
    CURRY LEAVES | कड़ी पत्ता 8-10
    METHI SEEDS | मेथी के बीज 1/4 TSP
    JAGGERY | गुड़ 1 TBSP
    FRESH CORIANDER | हरा धनिया A SMALL HANDFUL (CHOPPED)
    Method:
    Add the sour curd, gram flour, ginger chilli paste & salt into a large bowl & whisk well to make a smooth paste, then add the water & whisk well again to make a liquidy batter.
    Further add the batter into a stock pot, switch on the flame to high & bring the kadhi over a boil while stirring at regular intervals.
    Once the kadhi comes to a boil, lower the flame & let it simmer, meanwhile set a small tadka pan over high heat on the side & add ghee into it, once the ghee gets hot add in the whole spices along with red chilli, asfoetida, curry leaves & methi seeds.
    Pour the tadka on the kadhi & cover it immediately, keep it covered for 30 seconds & then remove the lid, stir well & add jaggery, stir again & cook the kadhi for 2-3 minutes.
    Further taste & adjust the salt & jaggery as per your preference then cover & cook the kadhi for 4-5 minutes over low heat.
    Once cooked, remove the lid & finally add freshly chopped coriander & stir well.
    Your delicious sweet & sour gujarati kadhi is ready.

    Khichdi
    Ingredients:
    RICE | चावल 1/2 CUP (KOLUM)
    GREEN MOONG DAL | हरी मूंग दाल 1/2 CUP
    GHEE | घी 1 TBSP
    CUMIN SEEDS | जीरा 1/2 TSP
    ASAFOETIDA | हींग 1/4 TSP
    WATER | पनी 4 CUPS
    SALT | नमक TO TASTE
    TURMERIC POWDER | हल्दी पाउडर 1/4 TSP
    Method:
    Add the rice & dal into a bowl & wash them well until the water turns clear, then add fresh water & let the rice & dal soak for 20-25 minutes, you can cook the kadhi while they are soaking.
    Once soaked, discard the water.
    Set a pressure cooker over high heat & once it gets hot, add in the ghee & once the ghee gets hot add the cumin seeds & asafoetida, let the cumin seeds crackle & then add the soaked rice & dal.
    Stir well & cook the rice & dal for 1-2 minutes, then add water along with salt & turmeric powder, stir well & bring it to a boil.
    Further place the lid & pressure cook the khichdi for 4 whistles over medium high flame then switch off the flame & let the cooker de-pressurize naturally.
    Once de-pressurized, remove the lid & give the khichdi a nice stir, you can add more hot water & cook it further for a few minutes until the desired consistency is achieved or if you like it a bit thicker then you can add only 3-3.5 cups of water.
    Your gujarati khichdi is ready, serve it hot alon with hot kadhi, papad & pickle & make sure to top it up with ghee.

    #YFL #SanjyotKeer #khichdikadhi

    The Music I use in All my videos – https://bit.ly/3CdPbSc
    (Best for independent creators)

    Follow us on all platforms:
    Facebook – https://bit.ly/3o6alLt
    Instagram – https://bit.ly/2RFkL8z

    Follow my personal handles here: (Chef Sanjyot Keer)
    Facebook – https://bit.ly/3tpjqQA​​​​​​​​​
    Instagram – https://bit.ly/3o0FZK8
    Twitter – https://bit.ly/33qQpJN

    Chaapters
    Intro 0:00
    Rice & Dal Soaking 1:19
    Kadhi 2:26
    Khichdi 5:58
    Plating 7:51
    Outro 9:36

  • Paneer 65 Recipe | Paneer Starter Recipe | पनीर 65 | Chef Sanjyot Keer

    Paneer 65 Recipe | Paneer Starter Recipe | पनीर 65 | Chef Sanjyot Keer

    Full written recipe for Paneer 65

    Prep time: 10-15 minutes
    Cooking time: 15-20 minutes
    Serves: 4-5 people

    Ingredients:
    Ginger garlic chilli paste
    GARLIC | लेहसुन 4-5 CLOVES
    GINGER | अदरक 2 INCH
    GREEN CHILLI | हरी मिर्च 3 NOS.
    WATER | पानी AS REQUIRED
    Batter
    RICE FLOUR | चावल का आटा 1/2 CUP
    CORN FLOUR | कॉर्न फ्लोर 1/4 CUP
    KASHMIRI RED CHILLI POWDER | कश्मीरी लाल मिर्च पाउडर 2 TBSP
    GARAM MASALA | गरम मसाला 1/2 TSP
    CUMIN POWDER | जीरा पाउडर 1/2 TSP
    BLACK PEPPERCORNS | साबुत काली मिर्च 1/4 TSP (FRESHLY CRUSHED)
    SALT | नमक TO TASTE
    GINGER GARLIC GREEN CHILLI PASTE | अदरक लेहसुन और मिर्च की पेस्ट
    CURRY LEAVES | कड़ी पत्ता 20-25 NOS. (CHOPPED)
    CURD | dahi 4 TBSP (WHISKED)
    HOT OIL | garam तेल 2 TBSP
    WATER | पनी AS REQUIRED (ADDED GRADUALLY)
    Paneer coating & Frying
    PANEER | पनीर 500 GRAMS (CUBED)
    CORN FLOUR | कॉर्न फ्लोर 1 TBSP
    Tempering
    OIL | तेल 2-3 TBSP
    GARLIC | लहसुन 2-3 TBSP (CHOPPED)
    GREEN CHILLI | हरी मिर्च 3-4 NOS. (CHOPPED)
    CURRY LEAVES | कड़ी पत्ता 4-5 SPRIGS
    BLACK PEPPERCORNS | साबुत काली मिर्च A PINCH (CRUSHED)
    SALT | नमक A PINCH
    Method:
    Add the garlic, ginger & green chilli along with a splash of water & grind it into a fine paste.
    To make the batter add the rice flour, corn flour, kashmiri red chilli powder & all the remaining ingredients of the batter then gradually add water as required & whisk continuously to make a thick batter.
    Add a tablespoon of corn flour on the cubed paneer & coat it by mixing it gently.
    Further add the paneer to the batter & coat it the batter nicely.
    To fry the paneer heat oil upto 170 C (moderately hot) then carefully drop the coated paneer into the hot oil & fry it over medium high flame until light golden brown.
    Further remove the paneer from the oil & transfer it into a sieve, let the paneer rest for 5-10 & heat the oil slightly more.
    Once rested, flash fry the paneer until it turns golden brown & crips, then transfer it into a sieve again.
    Set a wok over high heat & once it gets hot, add in the oil & let it get hot as well.
    Further add garlic, green chilli, curry leaves, stir & cook over high flame for 1-2 minutes then add the fried paneer, crushed black peppercorns & salt, toss well.
    Your Paneer 65 is ready.

    #YFL #SanjyotKeer #paneer65

    The Music I use in All my videos – https://bit.ly/3CdPbSc
    (Best for independent creators)

    Follow us on all platforms:
    Facebook – https://bit.ly/3o6alLt
    Instagram – https://bit.ly/2RFkL8z

    Follow my personal handles here: (Chef Sanjyot Keer)
    Facebook – https://bit.ly/3tpjqQA​​​​​​​​​
    Instagram – https://bit.ly/3o0FZK8
    Twitter – https://bit.ly/33qQpJN

    Chapters
    Intro 0:00
    Batter 0:43
    Paneer Coating & Frying 1:52
    Tempering 4:12
    Plating 4:49
    Outro 5:12

  • Butter chicken with @YashrajMukhateOfficial X Chef Sanjyot Keer #shorts #ytshorts

    Butter chicken with @YashrajMukhateOfficial X Chef Sanjyot Keer #shorts #ytshorts

    Don’t miss the end kyuki aaj Rasode mein Pawri Ho Rahi Hai!!

    I made @YashrajMukhateOfficial cook some delicious SK style Butter Chicken & this is one of the most fun collabs I have ever done!

    Collab kaisa laga aur batao end kaisa laga??

    #yfl #SanjyotKeer #butterchicken

    The Music I use in All my videos – https://bit.ly/3CdPbSc
    (Best for independent creators)

    Follow us on all platforms:
    Facebook – https://bit.ly/3o6alLt
    Instagram – https://bit.ly/2RFkL8z

    Follow my personal handles here: (Chef Sanjyot Keer)
    Facebook – https://bit.ly/3tpjqQA​​​​​​​​​
    Instagram – https://bit.ly/3o0FZK8
    Twitter – https://bit.ly/33qQpJN

  • Dahi Ke Sholay | Easy Snack Recipe | दही के शोले | Chef Sanjyot Keer

    Dahi Ke Sholay | Easy Snack Recipe | दही के शोले | Chef Sanjyot Keer

    Full written recipe for Dahi ke Sholay

    Prep time: 10-15 minutes (excluding hung curd resting time)
    Cooking time: 15 minutes
    Serves: 3-4 people

    Ingredients:
    CURD | दही 3 CUPS
    CAPSICUM | शिमला मिर्च 1/2
    RED BELL PEPPER | लाल शिमला मिर्च 1/2
    YELLOW BELL PEPPER | पीली शिमला मिर्च 1/2
    CARROT | गाजर 1/2
    GREEN CHILLI | हरी मिर्च 2 NO.
    GINGER GARLIC PASTE | अदरक लेहसुन की पेस्ट 1 TSP
    POWDERED SUGAR | पीसी हुई शक्कर 1/2 TBSP
    SALT | नमक TO TASTE
    BLACK PEPPER POWDER | काली मिर्च पाउडर A PINCH
    FRESH CORIANDER | हरा धनिया R 1 TBSP (CHOPPED)
    MINT | पुदीना 1 TBSP (CHOPPED)
    SANDWICH BREAD | सैंडविच ब्रेड AS REQUIRED
    WATER | पानी
    Method:
    To make hung curd, place a sieve over a large vessel & then place a muslin cloth over it & transfer the curd in the muslin cloth then lift it up & twist the cloth & let the water drip out.
    Further place the cloth in the sieve & place some weight on the curd & let it rest for 1.5-2 hours.
    After the rest you’ll see that all the water has squeezed out & your hung curd is ready.
    Transfer the hung curd into a large bowl & add capsicum, bell peppers & all the remaining ingredients of the filling & mix everything well, your filling is ready.
    Take sandwich bread slices as required & trim the sides.
    To shape the sholay take any plastic sheet & place it on a flat surface then take a slice of the bread & wet it slightly using water.
    Place the bread slice on the plastic sheet then flatten out the bread using your fingers, then place a spoonful of the filling & place it on the corner of the bread, further roll it towards the opposite corner then wrap the entire rolled bread with the plastic sheet & press the sides while pushing the filling towards the centre, it should look like a toffee, your shaped dahi ke sholay is ready to be fried, shape the rest similarly.
    Heat oil until it gets moderately hot (170 C), then carefully drop the shaped bread into the oil & fry over medium high heat until golden brown & crisp.
    Once fried transfer them into a sieve so that all the oil drips off.
    Your delicious dahi ke sholay are ready.

    #YFL #SanjyotKeer

    The Music I use in All my videos – https://bit.ly/3CdPbSc
    (Best for independent creators)

    Follow us on all platforms:
    Facebook – https://bit.ly/3o6alLt
    Instagram – https://bit.ly/2RFkL8z

    Follow my personal handles here: (Chef Sanjyot Keer)
    Facebook – https://bit.ly/3tpjqQA​​​​​​​​​
    Instagram – https://bit.ly/3o0FZK8
    Twitter – https://bit.ly/33qQpJN

    Intro 0:00
    Hung curd 0:38
    Filling 2:08
    Shaping 3:05
    Frying 5:11
    Plating 6:00
    Outro 6:20