Category: Uncategorized
-
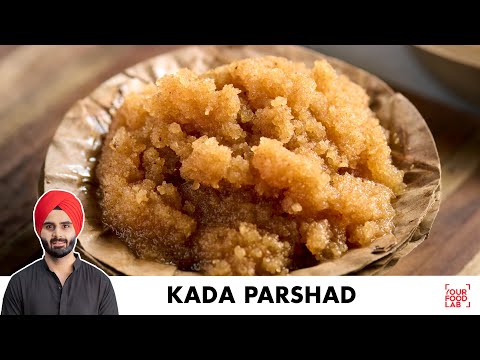
Kada Parshad Recipe | Aate Ka Halwa | कड़ा परशाद | आटे का हलवा | Chef Sanjyot Keer
Full written recipe for Kada Parshad
Prep time: 5 minutes
Cooking time: 15 -20 minutes.
Serves: 6-7 people.Ingredients:
GHEE | घी 1 KATORI
KARKARA AATA | करकरा आटा 1 CUP
SUGAR | शक्कर 1 CUP
WATER | पानी 2 CUP
Method:
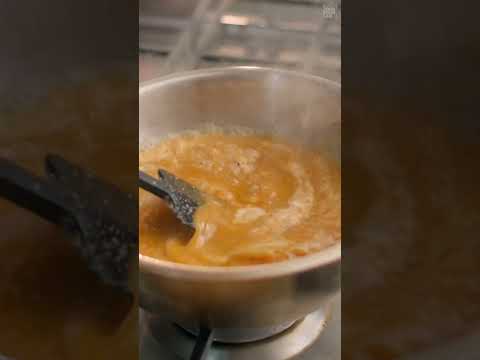
Set a deep pan over high flame & once it gets hot, add in the ghee.
When the ghee gets hot add the flour while continuously stirring to prevent the formation of lumps.
Cook the flour over low flame until it turns dark biscuity in colour, make sure you keep stirring it continuously.
Once the flour & ghee turn dark biscuity in colour add the sugar & water, then increase the flame to medium low & cook the halwa until all the ghee separates.
Switch off the flame once the ghee separates, you kada / aate ka halwa is ready.#YFL #SanjyotKeer #kadaparshad
The Music I use in All my videos – https://bit.ly/3CdPbSc
(Best for independent creators)Follow us on all platforms:
Facebook – https://bit.ly/3o6alLt
Instagram – https://bit.ly/2RFkL8zFollow my personal handles here: (Chef Sanjyot Keer)
Facebook – https://bit.ly/3tpjqQA
Instagram – https://bit.ly/3o0FZK8
Twitter – https://bit.ly/33qQpJNChapetrs
0:00 Intro
1:22 Ingredient explanation
2:10 Measuring technique
2:39 Process
5:02 Serving
5:34 Outro -

Veg Chowmein Recipe | How to boil Noodles Perfectly | ठेले वाली चाऊमीन | Chef Sanjyot Keer
Full written recipe for Veg Chowmein
Prep time: 20-25 minutes
Cooking time: 5-10 minutes
Serves: 3-4 peopleIngredients:
SALT | नमक TO TASTE (FOR NOODLES)
NOODLES | नूडल्स 200 GRAMS
WATER | पानी AS REQUIRED
OIL | तेल 1-2 TBSP (FOR NOODLES)
OIL | तेल 2 TBSP
GINGER | अदरक 1 TBSP (CHOPPED)
GARLIC | लेहसुन 1 TBSP (CHOPPED)
GREEN CHILLI | हरी मिर्च 2 NOS. (SLICED)
ONION | प्याज़ 1 NO. (SLICED)
CARROT | गाजर 1 NO. (JULIENNE)
CAPSICUM | शिमला मिर्च 1 NO. (JULIENNE)
CABBAGE | पत्ता गोभी ½ NO. (SHREDDED)
SUGAR | शक्कर A PINCH
SPRING ONION BULBS | स्प्रिंग ऑनियन बल्ब्स 2 TBSP
WHITE PEPPER POWDER | सफेद मिर्च पाउडर A PINCH
SALT | नमक TO TASTE
DARK SOY SAUCE | डार्क सोया सॉस 1 TSP
VINEGAR | सिरका 1/2 TSP
KETCHUP | केचअप 1 TBSP
RED CHILLI SAUCE | रेड चिली सॉस 1 TBSP
SPRING ONION GREENS | हरे प्याज़ के पत्ते A SMALL HANDFUL
Method:
Bring water to a roaring boil & add salt to taste.
Add noodles in the boiling water & only boil them for 30 seconds or until all the noodles have separated.
Further, switch off the flame & cover it for two to two & a half minutes.
Remove them using a pair of tongs & transfer them into a sieve, rinse them will cold water immediately to stop the cooking process & drizzle some oil over them to prevent them from sticking to each other.
Your perfectly boiled noodles are ready.
To cook the chowmein, set a wok over high heat & once it gets hot add the oil.
Once the oil gets hot, add ginger, garlic & green chillies, toss over high flame for a minute.
Further add all the veggies along with a pinch of sugar & toss the veggies over high flame for 30 seconds.
Further add spring onion bulbs, boiled noodles, white pepper powder, salt & the remaining ingredients of the chowmein, stir well & cook for a minute.
Your desi veg chowmein is ready.#YFL #SanjyotKeer #VegChowmein
The Music I use in All my videos – https://bit.ly/3CdPbSc
(Best for independent creators)Follow us on all platforms:
Facebook – https://bit.ly/3o6alLt
Instagram – https://bit.ly/2RFkL8zFollow my personal handles here: (Chef Sanjyot Keer)
Facebook – https://bit.ly/3tpjqQA
Instagram – https://bit.ly/3o0FZK8
Twitter – https://bit.ly/33qQpJNChapters
0:00 Intro
1:02 Cutting Veggies
7:00 Noodles
10:03 Chowmein
11:08 Plating
Outro 11:34 -

Eggless Chocolate Strawberry Cake Recipe | अंडे के बिना चॉकलेट स्ट्रॉबेरी केक | Chef Sanjyot Keer
Full written recipe for Chocolate Strawberry Cake
Prep time: 15-20 minutes
Cooking time: 45-50 minutes
Serves: 6-7 peopleIngredients:
Sponge
BUTTER | मक्खन 100 GRAMS (SOFT)
CASTOR SUGAR | कैस्टर शुगर 15 GRAMS
CONDENSED MILK | कंडेंस्ड मिल्क 200 GRAMS
VANILLA ESSENCE | वैनिला एसेंस 5 ML
MILK | दूध 100 ML
CURD | दही 55 GRAMS
VINEGAR | सिरका 1/2 TSP
REFINED FLOUR | मैदा 100 GRAMS
COCOA POWDER | कोको पाउडर 30 GRAMS
BAKING SODA | बेकिंग सोडा 1 TSP
Method:
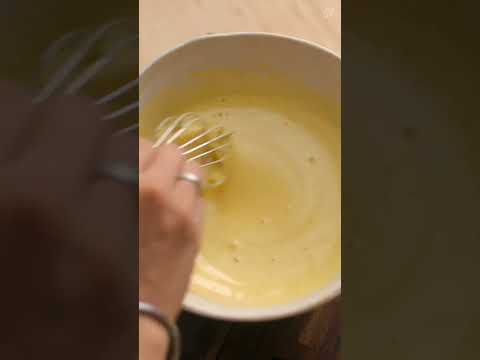
To make the chocolate sponge, add the butter & castor sugar into a large bowl & whisk them both until the butter turns pale in colour & gets fluffy.
Further add the condensed milk & vanilla essence, whisk well to incorporate the condensed milk with the butter, once the condensed milk gets incorporated, add the milk & mix it well.
Then in a separate bowl mix the curd & vinegar together then add the curd into the batter & mix well using a whisk, your wet ingredients are ready.
Place a sieve over the bowl & add the refined flour, cocoa powder & baking soda into the sieve, sieve all the dry ingredients into the wet ingredients, make sure you sieve the lumps of cocoa powder that remain in the sieve.
Mix the dry ingredients well with the wet ingredients until no dry flour remains, make sure that you don’t overmix the batter.
Your batter for cake sponge is ready, pour the batter into a 7-inch parchment paper lined baking tin & bake in a 170 C oven for 30 minutes.
While the sponge is baking you can continue to make the further components of the cake.
Ganache
DARK CHOCOLATE COMPOUND | डार्क चॉकलेट कमपाउंड 200 GRAMS (CHOPPED)
FRESH CREAM | फ्रेश क्रीम 100 GRAMS
Method:
Set a heatproof bowl over a stock pot with boiling water, then add the chopped chocolate along with the fresh cream, whisk contiguously until all the chocolate melts.
Once the chocolate melts, remove the heatproof bowl from the stock pot, cover it with a cling & poke holes into it.
Place the ganache in the fridge for 30 minutes for it to set after which your ganache will be ready to be used.
For layering
STRAWBERRY | स्ट्रॉबेरी 300 GRAMS (CHOPPED)
POWDERED SUGAR | पीसी हुई शक्कर 2 TBSP
SUGAR | शक्कर 1/4 CUP
BOILING WATER | उबलता हुआ पानी 1/2 CUP
Method:
Add all the chopped strawberries into a bowl & add the powdered sugar, mix well & set it aside, your chopped strawberries for layering are ready.
To make the sugar water, add the sugar into a bowl then add boiling water into it, mix well until all the sugar dissolves then cool it down completely, you sugar water is ready.
Topping
NUTELLA | न्यूटेला 100-150 GRAMS
STRAWBERRY | स्ट्रॉबेरी (HALVED)
Method:
Once baked, remove the tin from the oven, to check if the sponge has baked correctly, insert a toothpick in the centre of the sponge, it should come out clean.
Let the sponge cool down in the tin for 10 minutes, then invert it onto a wire rack & peel off the parchment paper, then cover the sponge with a damp cloth & cool it down completely.
Once cooled cut the sponge into 3 equal layers using a serrated knife, your cake is now ready to be layered.
Spread a dash of the ganache on a large plate or a cake stand & place the bottom layer of the sponge on it & brush the sugar water on the surface of the sponge, this will help the sponge to remain the moist & soft.
Then spread an even layer of the ganache on the sponge & then spread half amount of the chopped strawberries.
Then place the second layer of the sponge over the strawberries & repeat the process of layering.
Once you have applied one more layer of the sugar water, ganache & chopped strawberries, place the third layer of the sponge.
Then apply the remaining sugar syrup from the strawberries on the top layer then brush the remaining amount of sugar water.
Further pour the nutella & spread it evenly, you can also decorate it in swirls like how I did.
Then use the halved strawberries to decorate the cake, you can also decorate the cake as per your preference & liking.
Your chocolate strawberry cake is ready, set in the fridge for at least an hour before cutting it.#YFL #SanjyotKeer #strawberrycake
The Music I use in All my videos – https://bit.ly/3CdPbSc
(Best for independent creators)Follow us on all platforms:
Facebook – https://bit.ly/3o6alLt
Instagram – https://bit.ly/2RFkL8zFollow my personal handles here: (Chef Sanjyot Keer)
Facebook – https://bit.ly/3tpjqQA
Instagram – https://bit.ly/3o0FZK8
Twitter – https://bit.ly/33qQpJN -

Crispy Honey Chilli Potatoes | क्रिस्पी हनी चिल्ली पोटेटोस | Chef Sanjyot Keer
Home-made Schezwan Sauce https://www.youtube.com/watch?v=tjFyqHV6p4A
Full written recipe for Honey Chilli Potatoes
Prep time: 20-25 minutes
Cooking time: 20-25 minutes
Serves: 2-3 peopleIngredients:
Fried Potato
POTATO | आलू 3-4 NOS.
VINEGAR | सिरका 1 TSP
SALT | नमक TO TASTE
REFINED FLOUR | मैदा 1/2 CUP
CORN FLOUR | कॉर्न फ्लोर 1/2 CUP
SALT | नमक TO TASTE
BLACK PEPPER POWDER | काली मिर्च पाउडर A PINCH
BAKING SODA | बेकिंग सोडा A PINCH
WATER | पानी 3/4 CUP (ICE COLD)
Sauce & Tossing
OIL | तेल 2-3 TBSP
GINGER | अदरक 1 TBSP (CHOPPED)
GARLIC | लेहसुन 2 TBSP (CHOPPED)
GREEN CHILLI | हरी मिर्च 2-3 NOS. (SLICED)
SPRING ONION BULBS | स्प्रिंग ऑनियन बल्ब्स 2 TBSP
HOMEMADE SCHEZWAN SAUCE | होममेड शेज़वान सॉस 2 TBSP
RED CHILLI SAUCE | रेड चिली सॉस 1 TBSP
KETCHUP | कैचअप 3 TBSP
LIGHT SOY SAUCE | लाइट सोया सॉस 1 TSP
HONEY | शहद 2-3 TBSP
WHITE PEPPER POWDER | सफेद मिर्च पाउडर A PINCH
SALT | नमक TO TASTE
ONION | प्याज़ 1 NO. (SLICED)
CAPSICUM | शिमला मिर्च 1 NO. (SLICED)
WATER | पानी A SPLASH
CORN FLOUR | कॉर्न फ्लोर 2 TBSP
WATER | पानी 4 TBSP
FRESH CORIANDER | हरा धनिया A SMALL HANDFUL (CHOPPED)
SPRING ONION GREENS | हरे प्याज़ के पत्ते A SMALL HANDFUL (CHOPPED)Method:
Cut the peeled potatoes into thick french fries as shown in the video.
Bring water to a roaring boil in a stock pot, add vinegar & salt along with the cut potatoes.
Cook the potatoes for 3-4 minutes, then remove the potatoes from the water using a large spider & transfer them onto a sieve & let them cool down completely.
To make the batter add the refined flour, corn flour, salt, black pepper powder, baking soda & chilled water into a large bowl & whisk continuously to make a semi thick batter, make sure you add the water gradually while whisking continuously.
Further dip & coat the blanched potatoes in the batter & fry them in moderately hot oil (165 C) over medium high flame until light golden brown.
Once the potatoes turn light golden brown, transfer them into a sieve & let them rest for 5 minutes & let the oil heat slightly more (180 C).
Double fry the potatoes in hot oil once they have rested, fry them until they become golden brown & super crisp then transfer them into a sieve, your fried crispy potatoes are ready.
To make the sauce heat a wok over high flame & then add the oil & heat the oil as well.
Further add ginger, garlic & green chilli, stir & cook over high flame for a few seconds.
Then add spring onion bulbs, schezwan sauce & the remaining ingredients of the sauce, stir well & cook over high flame for 1 minutes & then add a splash of water, then bring the sauce to a simmer.
Further add the corn flour & water in a separate bowl, stir well to make a slurry, then add the slurry while stirring the sauce continuously.
Once the sauce thickens, lower the flame & add the fried potatoes along with fresh coriander & spring onion greens, toss & coat the potatoes well with the sauce, make sure you don’t cook a lot at this stage or else the potatoes will turn soggy.
Your honey chilli potato is ready.#YFL #SanjyotKeer #HoneyChilliPotatoes
The Music I use in All my videos – https://bit.ly/3CdPbSc
(Best for independent creators)Follow us on all platforms:
Facebook – https://bit.ly/3o6alLt
Instagram – https://bit.ly/2RFkL8zFollow my personal handles here: (Chef Sanjyot Keer)
Facebook – https://bit.ly/3tpjqQA
Instagram – https://bit.ly/3o0FZK8
Twitter – https://bit.ly/33qQpJNChapters
0:00 Intro
0:45 Crispy potatoes
3:32 Sauce & tossing
5:05 Plating
5:34 Outro -

Masala Dosa Recipe | Perfect Dosa Atta Tips | परफेक्ट मसाला दोसा बनानेका तरीका | Chef Sanjyot Keer
Giveaway Alert!
Step 1: Subscribe to YFL & Hamilton Beach India’s YouTube channel
Subscribe to Hamilton Beach India: https://bit.ly/3avSNCn
Step 2: Like this video
Step 3: Comment below: “If I get this Hamilton Beach India’s Professional Juicer Mixer Grinder then I will first cook…………..” Complete the sentence mentioning which recipe you will first cook when you get this mixer grinder.3 lucky winner will get a Hamilton Beach India’s Professional Juicer Mixer Grinder*
Entries open till 31/12/2022, until 11:59 pm (IST). You can only participate from India.
Winner announcement on 07/01/2023. Check your comment replies..Super excited to see your entries.
Check out Hamilton Beach India’s Professional Juicer Mixer Grinder:https://amzn.to/3WrRzOJ
Hamilton Beach products on Amazon: https://amzn.to/3LSOQc2#YFL #SanjyotKeer #masaladosarecipe
#YFLXHamiltonBeachIndia #SayHelloToPerfection #ProResultsAtHome #HamiltonBeachIndia #CookLikeAProFull written recipe for Masala Dosa
Prep time: 30-35 minutes
Cooking time: 30-35 minutes (excluding soaking & fermentation time)
Serves: 20 dosasIngredients:
Dosa batter
DOSA RICE / MOTI RICE | डोसा चावल / मोती चावल 3 CUPS
PARBOILED RICE | उकड़ा चावल 1 CUP
URAD GOTA | उरद गोटा 1 CUP
POHA | पोहा 1/3 CUP
FENUGREEK SEEDS | मेथी के बीज 1/2 TBSP
WATER | पानी AS REQUIRED (FOR SOAKING)
WATER | पानी 2 CUPS (APPROXIMATELY)(FOR GRINDING)
SALT | नमक 1 TBSP
SUGAR | शक्कर 1 TBSP
SALT | नमक TO TASTE 1 TBSPPotato Masala
OIL | तेल 2 TBSP
MUSTARD SEEDS | राई 1/2 TSP
URAD DAL | उरद दाल 1/2 TSP
CHANA DALA | चना दाल 1/2 TSP
CASHEW | काजू 1/2 TBSP (CHOPPED)
ASAFOETIDA | हींग 1/2 TSP
GREEN CHILLI | हरी मिर्च 3 NOS. (CHOPPED)
GINGER | अदरक 1 TBSP (CHOPPED)
GARLIC | लेहसुन 1 TBSP (CHOPPED)
CURRY LEAVES | कड़ी पत्ता 8-10 NOS.
ONION | प्याज़ 3 NOS. (SLICED)
HOT WATER | गरम पानी 500 ML
POTATO | आलू 4 MEDIUM SIZED. (BOILED)
SALT | नमक TO TASTE
TURMERIC POWDER | हल्दी पाउडर 1/2 TSP
SUGAR | शक्कर A PINCH
FRESH CORIANDER | हरा धनिया A SMALL HANDFULCoconut Chutney
COCONUT | नारियल 1 CUP (DESICCATED)
ROASTED CHANA DAL | दालिया 1/3 CUP
GREEN CHILLI | हरी मिर्च 2 NOS.
SALT | नमक TO TASTE
CUMIN POWDER | जीरा पाउडर A PINCH
BLACK PEPPER POWDER | काली मिर्च पाउडर A PINCH
WATER | पानी AS REQUIRED
OIL | तेल 2 TBSP
MUSTARD SEEDS | राई 1/2 TSP
CHANA DAL | चना दाल 1/2 TSP
URAD DAL | उरद दाल 1/2 TSP
RED CHILLI | लाल मिर्च 2-3 NOS.
CURRY LEAVES | कड़ी पत्ता 6-8 NOS.Onion Tomato Chutney
OIL | तेल 2-3 TBSP
CHANA DAL | चना दाल 2 TSP
URAD DAL | उरद दाल 2 TSP
CURRY LEAVES | कड़ी पत्ता 12-15 NOS.
GARLIC | लेहसुन 12-15 CLOVES
GINGER | अदरक 2 INCH
GREEN CHILLI | हरी मिर्च 3-4 NOS.
CORIANDER STEM | धनिया के डंठल 2 TBSP
KASHMIRI RED CHILLI | कश्मीरी लाल मिर्च 3-4 NOS.
ONION | प्याज़ 2 MEDIUM SIZED. (ROUGHLY CHOPPED)
TOMATO | टमाटर 6 MEDIUM SIZED (ROUGHLY CHOPPED)
SALT | नमक TO TASTE
OIL | तेल 2 TBSP
MUSTARD SEEDS | राई 1/2 TSP
CHANA DAL | चना दाल 1/2 TSP
URAD DAL | उरद दाल 1/2 TSP
CURRY LEAVES | कड़ी पत्ता 6-8 NOS.
ASAFOETIDA | हींग 1/4 TSPDosa Making
GHEE | घी AS REQUIREDThe Music I use in All my videos – https://bit.ly/3CdPbSc
(Best for independent creators)Follow us on all platforms:
Facebook – https://bit.ly/3o6alLt
Instagram – https://bit.ly/2RFkL8zFollow my personal handles here: (Chef Sanjyot Keer)
Facebook – https://bit.ly/3tpjqQA
Instagram – https://bit.ly/3o0FZK8
Twitter – https://bit.ly/33qQpJNChapters
00:00 Intro
1:10 Dosa batter
7:24 Potato Masala
9:32 Coconut Chutney
10:43 Onion Tomato Chutney
13:24 Dosa making
15:01 Plating
16:00 Outro -
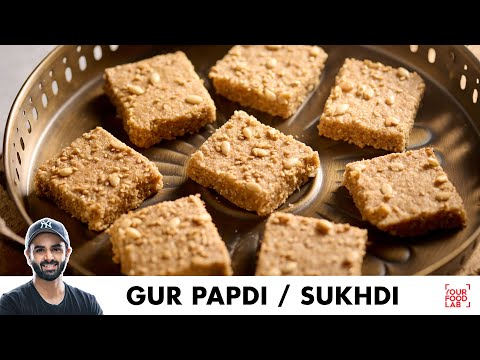
Gur Papdi Recipe | Gujarati Special Sukhdi | सर्दियों में बनाइये गुड़ पापड़ी | Chef Sanjyot Keer
Full written recipe for Gur Papdi / Gor Papdi / Sukhdi
Prep time: 10-15 minutes
Cooking time: 25-30 minutes
Serves: 6-8 peopleIngredients:
MELON SEEDS | मगज़ 1/3 CUP
WHITE SESAME SEEDS | सफेद तिल 1/3 CUP
DRY COCONUT | सूखा नारियल 1/3 CUP (DESCICCATED)
EDIBLE GUM | गोंद 1/3 CUP
CASHEW | काजू 1/2 CUP
ALMOND | बादाम 1/2 CUP
GHEE | घी 1.5 CUPS
WHEAT FLOUR | गेहूं का आटा 1 CUP
KARKARA AATA | करकरा आटा 1 CUP
GREEN CARDAMOM POWDER | हरी इलायची का पाउडर 1/2 TSP
LONG PEPPER POWDER | पिप्पली / गनठोड़ा पाउडर 1 TBSP
GINGER POWDER | सौंठ 1 TBSP
NUTMEG | जायफल A PINCH (GRATED)
JAGGERY | गुड़ 1 CUP (CHOPPED)
GHEE | घी AS REQUIRED
Method:
Set a pan over high flame & once it gets hot lower the flame & add in the melon seeds & white sesame seeds, fry roast them over low flame until they get almost light golden brown.
Further transfer them in a bowl & add the coconut in the same pan & dry roast it until light golden brown then transfer it into a separate bowl & cool it down.
Remove a few teaspoons of the melon & sesame seeds in a separate bowl to use it as a garnish.
Further transfer the remaining melon & sesame seeds in a mixer grinder jar & grind it into a coarse powder & then transfer it into a mixer grinder jar.
Add the edible gum into a mixer grinder jar & grind it into a coarse powder.
Add the cashews & almonds in a chopper & grind them into a coarse powder as well.
To make the mixture add the ghee into a hot deep pan, once the ghee melts add wheat flour & karkara aata, make sure you keep stirring it continuously to prevent the formation of lumps.
Cook the flour over low flame until it turns into a dark biscuity colour, this process will take 12-15 minutes.
Once the flour becomes dark biscuity in colour, add the edible gum powder, make sure you add it carefully as the ghee & flour mixture will fluff up once you add the gum powder, stir & cook over low flame for 1-2 minutes.
Further switch off the flame & add the melon & sesame seed powder, cashew almond powder, coconut, cardamom powder, long pepper power, ginger powder & nutmeg powder, mix well then add the chopped jaggery & mix until all the jaggery dissolves, make sure you keep the flame off, you don’t have to cook the jaggery or else it will result in a hard gur papdi.
Once all the jaggery melts, grease a large plate with ghee & add the mixture into the plate.
Further level out the mixture using a spatula & then flatten is out using a potato masher, further garnish with the reserved melon seeds & sesame seeds & let the gur papdi set for 10 minutes, then cut it into squares & let it set completely.
Once set, demould the cut gur papdi.
Your gur papdi is ready.#YFL #SanjyotKeer #gurpapdi
The Music I use in All my videos – https://bit.ly/3CdPbSc
(Best for independent creators)Follow us on all platforms:
Facebook – https://bit.ly/3o6alLt
Instagram – https://bit.ly/2RFkL8zFollow my personal handles here: (Chef Sanjyot Keer)
Facebook – https://bit.ly/3tpjqQA
Instagram – https://bit.ly/3o0FZK8
Twitter – https://bit.ly/33qQpJNChapters
00:00 Intro
1:11 Prep
5:18 Cooking
8:12 Setting
9:35 Plating
9:58 Outro -

Pav Bhaji Roll & Aloo Roll | Healthy Tiffin Roll | आसान रोल्स की रेसिपी | Chef Sanjyot Keer
Full written recipe for Aloo Tiffin Roll
Prep time: 15-20 minutes
Cooking: 15-20 minutes
Serves: 3-4 peopleAloo roll
Ingredients:
Filling
CARROT | गाजर 1/2 NO.
GREEN PEAS | हरे मटर 1/4 CUP (BOILED)
CAULIFLOWER | फूलगोभी 1/4 CUP (BOILED)
FRENCH BEANS | फ्रेंच बीन्स 1/4 CUP
CAPSICUM | शिमला मिर्च 1/2 NO.
OIL | तेल 1 TBSP
CUMIN SEEDS | जीरा 1 TSP
GREEN CHILLI | हरी मिर्च 1 NO. (OPTIONAL)
GINGER GARLIC PASTE | अदरक लेहसुन की पेस्ट 2 TSP
ASAFOETIDA | हींग A PINCH
SALT | नमक TO TASTE
POTATO | आलू 4 MEDIUM SIZED (BOILED)
POWDERED SPICES
TURMERIC POWDER | हल्दी पाउडर 1/2 TSP
CORIANDER POWDER | धनिया पाउडर 1 TBSP
GARAM MASALA | गरम मसाला 1/2 TSP
FRESH CORIANDER | हरा धनिया A SMALL HANDFUL (CHOPPED)
LEMON JUICE | निंबू का रस 1 TSP
Roll
BUTTER | मक्खन 1 TBSP (SOFT)
ROTI | रोटी 1 NO.
KETCHUP | कैचअप AS REQUIRED
RED CHILLI SAUCE | रेड चिली सॉस AS REQUIRED
PROCESSED CHEESE | प्रोसेस्ड चीज़ AS REQUIRED (GRATED)
FRANKIE MASALA | फ्रैंकी मसला A PINCH
Method:
Add the carrot, green peas, cauliflower, french beans & capsicum in a chopper & chop them coarsely.
To cook the filling, set a pan over high flame, add oil into it & once the oil gets hot add cumin seeds, green chilli, ginger garlic paste & asafoetida, stir well & cook the ginger garlic paste for a few seconds.
Further add the chopped veggies along with salt, then stir & cook the veggies for 2-3 minutes over high flame.
Then add the boiled potatoes into the pan by mashing them roughly with your hands along with all the powdered spices, fresh coriander & lemon juice, mash & mix everything using a potato masher & cook the filling for 2-3 more minutes.
Further taste & adjust the seasoning accordingly, your aloo filling is ready, transfer it into a bowl & cool it down.
To make the roll, take a large portion of the filling & shape it into a long patty, then add butter into a pan & cook the patty from both the sides until it gets a light golden-brown crust, your aloo patty is ready.
In the same pan add the roti & cook it briefly from both the sides.
Then apply some ketchup & red chilli sauce, place the patty & grate some processed cheese then sprinkle some frankie masala, roll & wrap it in a butter paper.
Your aloo tiffin roll is ready.Pav bhaji flavoured aloo roll
Ingredients:
Filling
OIL | तेल 1 TBSP
CUMIN SEEDS | जीरा 1/2 TSP
TOMATO | टमाटर 1 NO. (CHOPPED)
BEETROOT | चुकुंदर 1 TBSP (GRATED)
POTATO | आलू 4 MEDIUM SIZED (BOILED)
SALT | नमक TO TASTE
POWDERED SPICES
TURMERIC POWDER | हल्दी पाउडर 1/2 TSP
KASHMIRI RED CHILLI POWDER | कश्मीरी लाल मिर्च पाउडर 1 TSP
CORIANDER POWDER | धनिया पाउडर 1 TSP
PAV BHAJI MASALA | पाव भाजी मसाला 1 TBSP
LEMON JUICE | निंबू का रस 1 TSP
GARLIC PASTE | लेहसुन कि पेस्ट 1 TBSP
KETCHUP | कैचअप 1 TSP
BUTTER | मक्खन 1 TBSP
FRESH CORIANDER | हरा धनिया A SMALL HANDFUL
Roll
KETCHUP | कैचअप AS REQUIRED
RED CHILLI SAUCE | रेड चिली सॉस AS REQUIRED
PROCESSED CHEESE | प्रोसेस्ड चीजे AS REQUIRED (GRATED)
FRANKIE MASALA | फ्रैंकी मसाला A PINCH
Method:
Prep the veggies in the same way as the aloo roll, then add oil into a hot pan, once the oil gets hot add the cumin seeds along with the chopped veggies, tomato, beetroot & all the remaining ingredients of the filling.
Mash & mix everything using a potato masher & cook the filling for 2-3 minutes or until the moisture evaporates.
Finally add the butter & fresh coriander, stir well & your pav bhaji flavoured filling is ready.
Prep the roti in the same way & apply some ketchup & red chilli sauce on the roti, further place a large spoonful of the filling on the roti, grate some cheese & sprinkle frankie masala, roll & wrap it in a butter paper.
Your pav bhaji flavoured aloo tiffin roll is ready.Frankie masala link: https://youtu.be/lnpY75jTJeU
#YFL #SanjyotKeer #alooroll
The Music I use in All my videos – https://bit.ly/3CdPbSc
(Best for independent creators)Follow us on all platforms:
Facebook – https://bit.ly/3o6alLt
Instagram – https://bit.ly/2RFkL8zFollow my personal handles here: (Chef Sanjyot Keer)
Facebook – https://bit.ly/3tpjqQA
Instagram – https://bit.ly/3o0FZK8
Twitter – https://bit.ly/33qQpJNIntro 0:00
Aloo roll filling 1:11
Aloo roll preparation 3:04
Aloo roll plating 4:09
Pav bhaji roll filling 5:08
Pav bhaji preparation 6:09
Pav bhaji plating 6:37
Outro 6:42